CHAPTER 3
- Once you have control, you will be back at base in the shop area, talk to the receptionist if you need to shop some more otherwise talk to Pez and move on
- After a skippable cutscene, you will be put in a fight against Hooky and Steven with Gillian as your ally. This shouldn't be too hard, Shaun and Hooky play the same way, the only difference is that Hooky starts to distance the moment you blast him with melee attacks, Steven plays like a normal grunt. Just keep your distance from your ally Gillian as she will ALWAYS somehow hit you along with the other two. Yes there is friendly fire and will STAGGER YOU
- After the fight, you will be put into yet another tutorial, like any other tutorial, clear all popups and choose next subject until you can end the tutorial.
- Right after the tutorial, the game will once again prompt if you would like to buy from the shop. Choose yes and buy all the character related weapons and equipment that you can afford. This chapter will feature ALOT of personnel combat, some of which will require you to have decent equipment to be able to clear. If you still have spare funds, I advise you to buy the FCS HG and replace your original FCS in your LFO equips, though you can pick it up later if need be. Personally, I hate the personnel combat in this chapter, its way too janky to deal with and you'd have to rely on the 3 retry method
- You will then but put into a fight with another black custom LFO, this will be a pretty easy match if you just keep juggling the LFO with Somersault and double shooting with the Rapid Fire Laser. Just keep in mind that Somersault might put them in a spot that you can't reach, they will reset back however.
- After, you will then be placed in your first ever personnel combat, this is probably the jankiest part of the run and there is nothing anyone can do about it. Just keep in mind that submachine guns will stagger your movement so deal with them first, an Electrode gun will stun them which allows you to get in close and do some clean CQC.
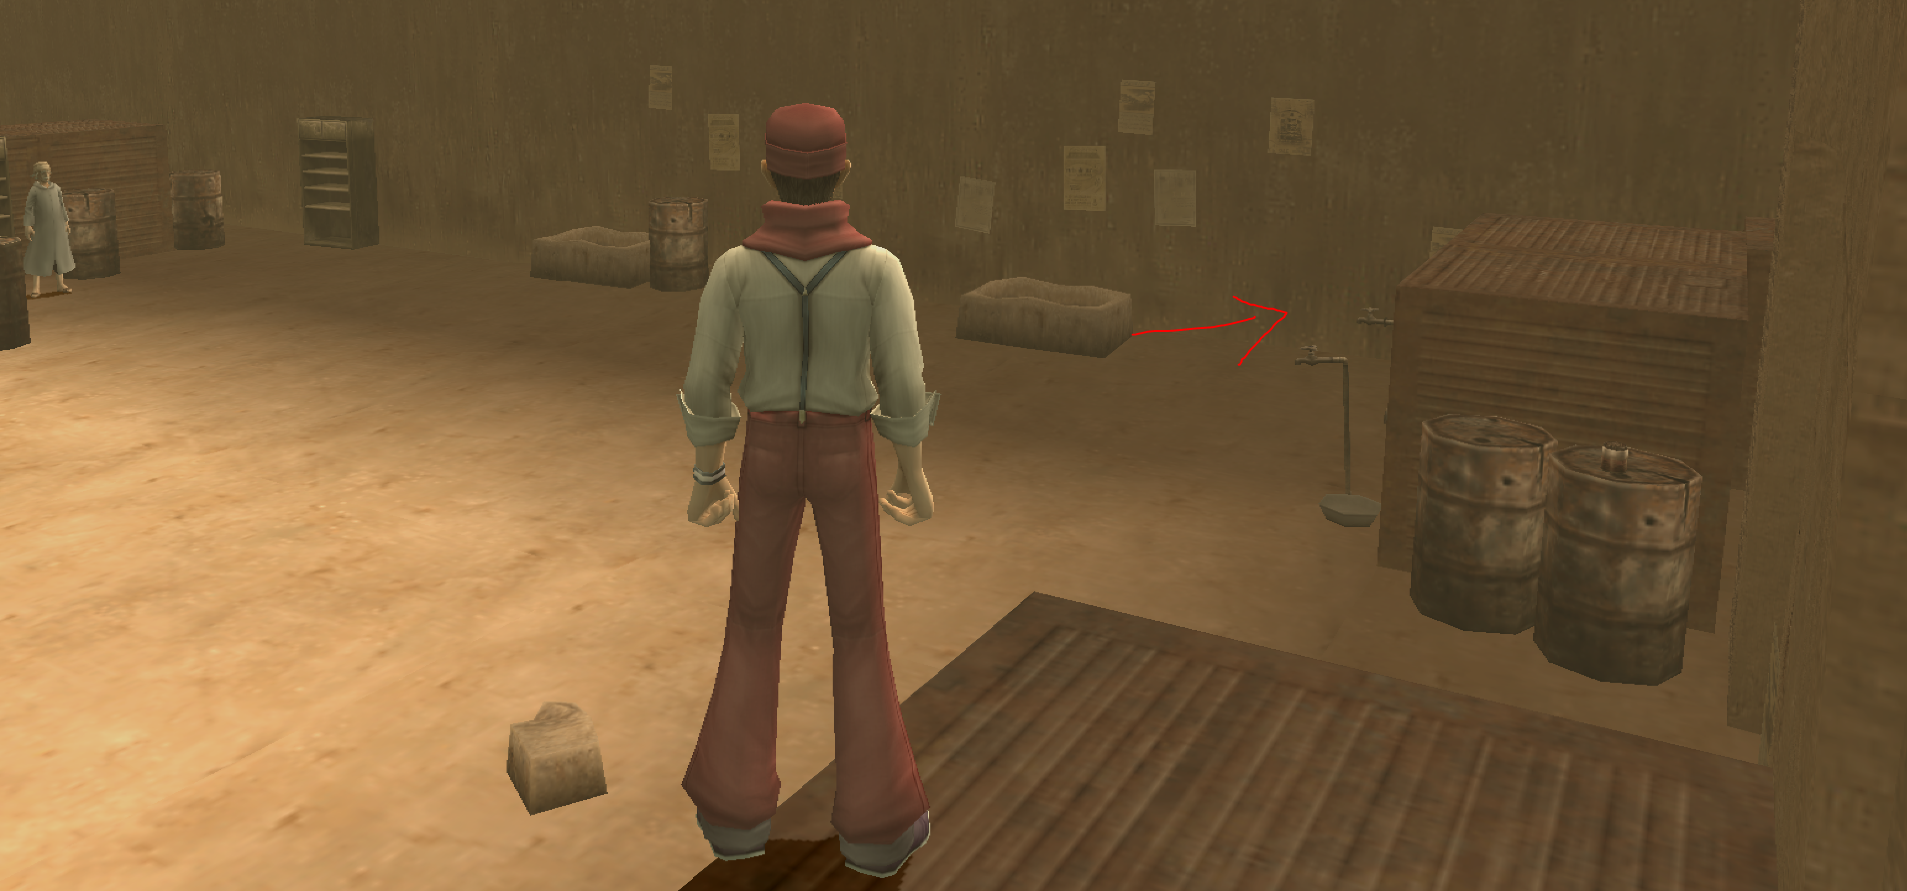
- After another set of cutscenes, you will be placed just outside of the Lifting spot with 4 people, start by talking to the person on the right until you reach Hooky, DO NOT talk to Hooky first, talk to everyone else before Hooky and it will then put you into a Lifting race against Hooky. I recommend taking this shortcut and not the other one as it is more janky (photo below)
 Do not go above and over the bars, go in-between. Going above will wipe you out most of the time, the other shortcut is way too janky to use and will net diminishing returns, hell sometimes it makes you go slower compared to going the normal way.
 - After the Lifting session you will then be placed in a Personnel fight with 3 Fire Blade members. You cannot use any of your weapons and are hardlocked into fighting CQC, all I can say is manage your stamina well or you will pay the price.
- Another set of cutscenes then you will be placed into another Lifting race, just keep in mind the shortcuts that I mentioned in step 7 and you will be fine, none of these guys can overtake you and the game is pretty lenient in giving you one mistake before they can catch up. Try not to wipeout more than once and you'll be just fine. 3 retries cannot save you here.
- Right after another long set of cutscenes you will be put into another personnel fight where you cannot use your weapons, only melee fighting. This is fairly simple and the same advice as step 8 applies.
- After another cutscene, you are then put into an LFO fight with 3 humanoids and 2 biped rocket launchers. As usual start with the biped launchers because of their stagger potential and its easier to burst them down by double shooting, the rest is simple.
- The game will then prompt you to shop, choose yes and buy the Power Cylinder HG, also don't forget to buy character equipment as another PITA Personnel fight is incoming and will be very difficult without proper equipment.
- WARNING HARD PERSONNEL FIGHT INCOMING, this section is probably the hardest to deal with, mainly because everyone has a machine gun and can stagger + melt your health. If you are having trouble please use the 3 retry method. The best way I found to deal with these guys is to pick them off one by one using the sniper as it deals the most damage, however you are very vulnerable as you need to stand still to go into first person mode, don't forget that you can lock on using L1 and pinpoint a more accurate shot. You have to fight all Personnel in the area before you can move on. You can also use the hotswap method here if you find yourself out of ammo.
- After a cutscene, you are then put into a 1v1 with the now known Black Custom LFO, this is the same as the opening fight of this chapter, the only difference is the terrain. If you keep juggling the LFO, just keep it in the middle and not to the rim as it gets a bit harder to connect shots or Somersaults
- Right after that 1v1, you will be put into another fight, this time its a 1v2 against Raul. I suggest you to ignore the Black Custom LFO and go straight for Raul, this might prove difficult with the terrain but it is certainly possible. Just keep in mind that you can press the emergency spin button whenever the Black Custom LFO tries to attack
- After a cutscene, you are then put in a 3v3 fight but with the same terrain as the opening fight. Keep in mind the terrain as you Somersault and you should be just fine, you also have to destroy all 3 enemy LFOs to move on. This marks the end of Chapter 3's Player controlled segment, the rest are all cutscenes and as usual the score screen pops up, signaling a split in your timer.
CHAPTER 4
- As with any start of the chapters, after the cutscene you will be place in the same lobby area as other chapters, talk with the receptionist and purchase Power Booster HG and then talk to Captain Saville to move on
- The opening battle will pit you against 5 LFOs, 3 Bipeds and 2 Humanoids, as usual deal with the Bipeds first then the Humanoids.
- You will then be placed in Personnel mode, you need to talk to the first kid you see TWICE and find the other kids before you can trigger the shop to appear.
So talk to the first kid you see on the left and work your way towards the end.
 Once you see the end, turn left and you will see an alleyway, turn there and head to the end of the alley.
  You should find one of the two kids, talk to her once.
 Once done you should see stairs on the right, go up and drop down over the boxes, talk to the kid on the far end corner on the right, after you drop down from the box.
 Now look back to where you came from and turn right, there should be a box you can vault over which will take you back to the main street from before.
 Talk to the first kid again then across you should be a box that you can vault over using a smaller box on the left side of it.
 Once you vault over, the shopkeep and a certain girl should be there. If not then you might have missed one.
- After a long slew of cutscenes, you will be then put into a 1v3 arena fight, this should be fairly simple with the correct weapons and equipment. Long range Laser will melt these LFOs and even more if you double shot with it, provided of course you equipped the HG versions of the Power Cylinder and FCS.
- After another set of cutscenes, you will then be put into a backstreet market, you can choose to shop if needed or talk to Lyla to immediately move on.
- After yet another set of cutscenes, you will then be put into another set of arena fights, this should also be fairly simple as most of these LFOs are paper thin in terms of armor. Double shot and Somersault will do their jobs really well here.
- After a long cutscene, you will be back to the main street however this time there's military grunts roaming and will shoot on sight, the same as Chapter 3's Step 13 fight however there is no need to fight. My advice here is to just RUN, don't look back. Hold X and go into the alley, up the stairs and straight across the backyard to Lyla.
- Once you regain control, you will be tasked to take 5 photos as evidence (you can take photos by pressing TRIANGLE and aiming with the Left analog stick, press TRIANGLE once and voila you've taken a photo), below are the things you need to take photos of and they are in no particular order:


 Bonus (There's more to these but I thought the ones above were the easiest to work with):
- After the introduction of one of the most hilarious characters to grace vol. 1, you are put into Personnel mode in an LFO fight, use your board to reach your 505 and fight. It is a standard 2v3 but there are reinforcements, once you reach two "waves" you will then be put into a 2v3 fight against Jean. Focus Jean (violet/purple colored LFO) as it will close out the fight earlier, there is no need to fight the other two grunts. This can be a bit difficult because Jean loves to spam rockets but shouldn't be as hard as Chapter 2. Please use 3 retries if you need the extra health. This marks the end of the Player controlled segments for Chapter 4, as usual cutscenes and scoreboard appears, this marks a split in your timer.
Uploading alleye7.PNG...
Once that is done and all the cutscenes have finished, you will be forced into a personnel fight with the Natabatchi brothers, this can be pretty challenging since both can be fast and hard hitters but as with any presonnel fight, manage your stamina well and space them out, all will be well. By the way- no weapons only CQC.
CHAPTER 5
- After a fairly long cutscene, you are put into LFO lifting training, as usual you are able to skip by closing all popup messages and pressing select --> next subject until you reach the end tutorial but there's a catch, you can't end the tutorial, you are place in an unskippable fight against Hooky. LFO lifting only has one move that you would constantly use, Round Trip Turn, the only thing that makes this complicated is the movement, you can use your long range weapons like rail guns and missile launchers but they barely scratch in terms of damage. To effectively fight in LFO lifting, you would need to use your hold button (SQUARE) and turn to form as straight a line as possible to use moves like round trip turn, you will know once you enter a cinematic animation. Once you get used to it, the game will move on.
- Right after LFO lifting training, you will be put into the lobby once again, talk to the receptionist and buy whatever you have missing otherwise talk to Gillian to move on
- After that you will be put into the locker rooms, talk to EVERYONE except Hooky twice then talk to Hooky twice after doing your rounds.
- Another set of cutscenes and it will put you in a small area with people, talk to EVERYONE and the game will automatically move on once you do, you will then be put in a 1v2 LFO fight that is fairly simple to clear especially with your equipment by now.
- Cutscenes galore! once you have control, you will be fighting a 2v4 LFO battle with Gillian as your ally, as always STAY FAR AWAY FROM GILLIAN if you don't want to get staggered. Otherwise this fight is fairly standard and nothing will be a detriment to you so long as you abuse Somersault and double shooting.
- After two cutscenes, you will be placed in probably the biggest run killer section of vol 1. You have to somehow help young Moondoggie in fighting an LFO as a personnel, it is recommended that you have bought LFO Sniper or Missile Launcher at this point in time. Everything else does peanuts. If you are lucky, you will be able to hit your shots and stagger the LFO most of the time, Moondoggie will do the rest.
- After that you will be subjected to the worst map to fight LFOs in, keep in mind the terrain and you will go through this rough patch just fine. Two battles, one 1v2 and the other 1v3, you have to destroy all to move on.
- After another set of cutscenes, you will be asked to shop or not, press yes if you need to buy otherwise skip because at this point you should have all the equipment you need.
- You will then be placed in a Personnel battle against some hard hitting mobile security bots, LFO Sniper or Missile Launcher will singlehandedly carry you here, hotswapping will also be a huge help as both of those reload REAL SLOW even with a Loader attachment.
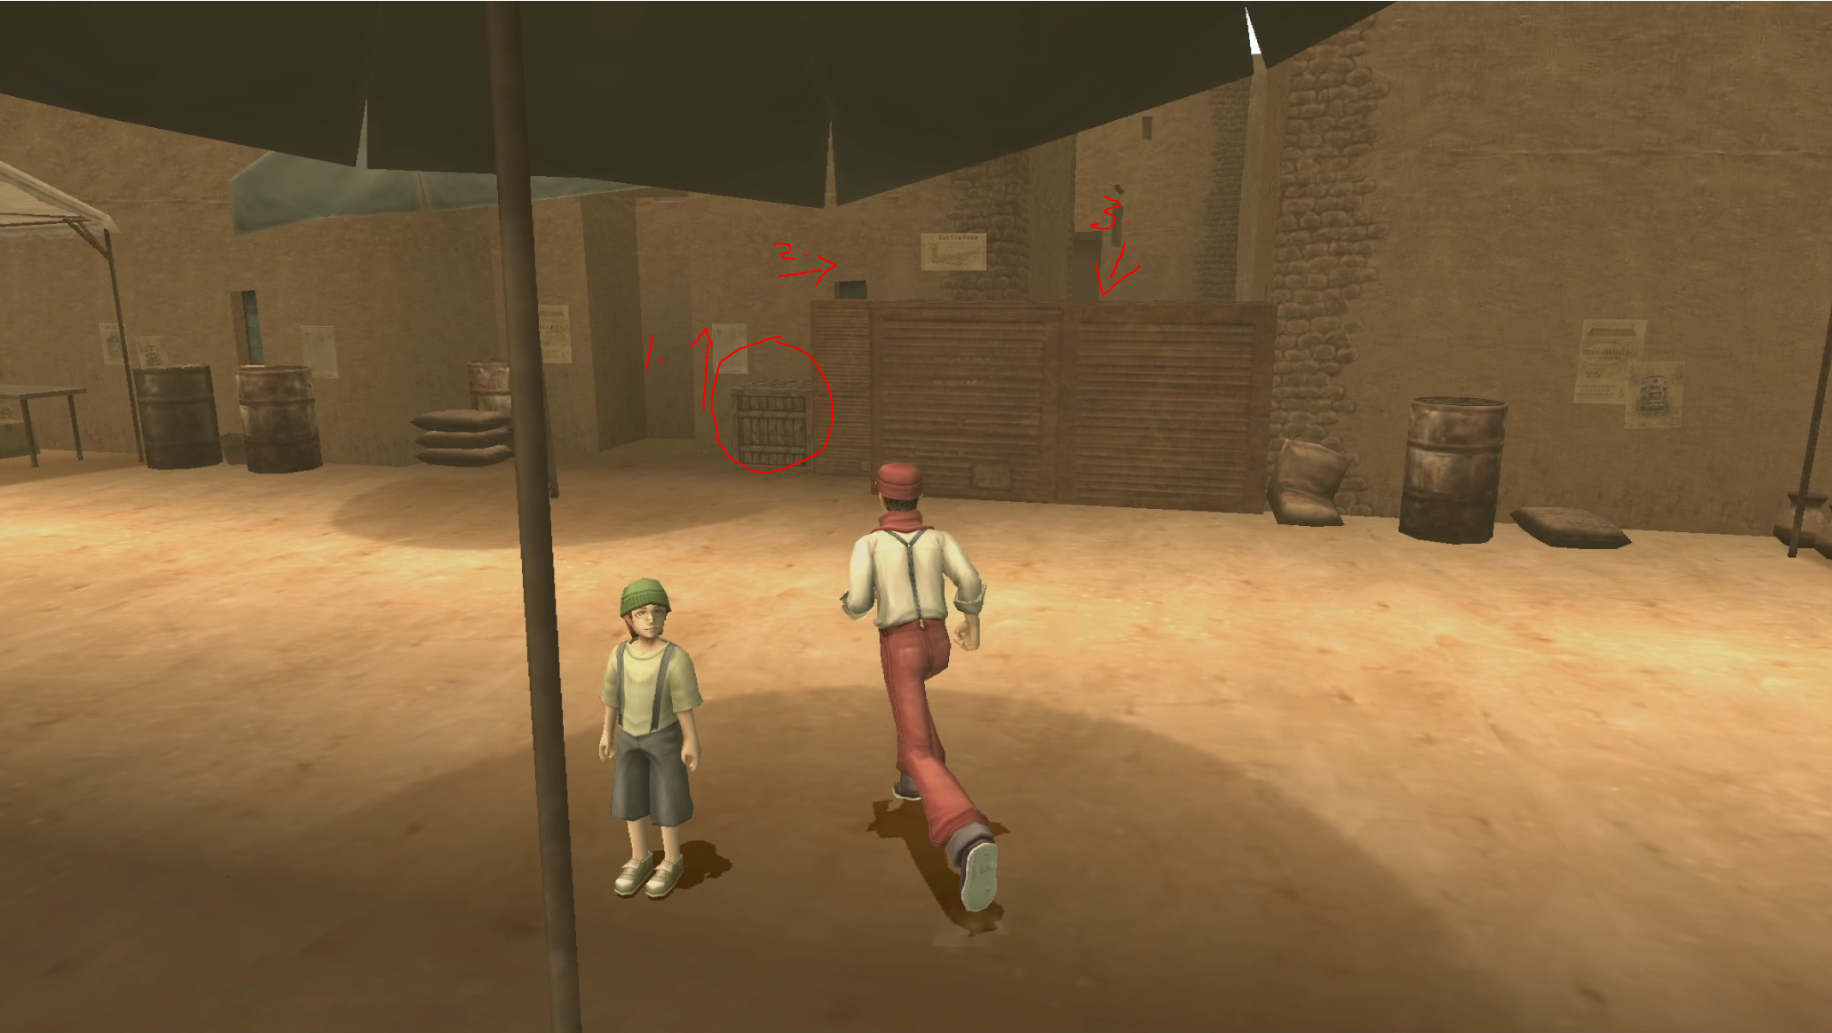
- After an intense cutscene, you will be placed in another Personnel fight HOWEVER there is absolutely no need to fight, just open the locks in the four corners around the two LFOs and press the control button next to the Nirvash. They can be opened in no particular order however the switch near the Nirvash (number 5 in the image below) always has to be last.

- After a relief of a cutscene, you will fight isolated 1v1 LFO battles, the same LFO that Raul used in Chapter 3. Once you defeat one, another one will come out, once you defeat two a cutscene will occur.
- After seeing Sumner get called out and once you have control, you will fight this orb like monstrosity of an LFO. DO NOT GET CLOSE TO IT once you get staggered by standing too close to melee, your health will take a one way trip to the shredder. Defeat this boss by using single shot weapons and double shooting with them. I prefer to use the Long Range Laser or the Rail Cannon to shred it's health to bits, it can also be stun locked by double shooting and hotswapping here would be infinitely useful. Do not use Missiles as they don't deal that much damage to single targets, only use single target weapons for maximum speed.
- Once the bamboozle of a cutscene is up, you are now piloting the NIRVASH one of the most fastest and strongest (in terms of vernier gauge) LFOs in the game. Protect Ruri in the 505 and once you deal enough damage to your former teammates, the game will interrupt with a cutscene.
- Once the cutscene is over, you will now be fighting a 1v2 against Hooky & Gillian in their respective 505s while you use the NIRVASH without any weapon attachments, Somersault Juggle and other special moves here are very useful and will be your bread and butter from now on. This should be fairly easy with a couple of well placed emergency spins and juggles, this should send both of them packing, leading into the final ground battle of vol 1.
- Once the cutscene is over, you will now fight Captain Saville in the unknown LFO that went berserk in Chapter 1. This is probably the HARDEST fight in all of vol 1. The general strategy is to keep juggling Saville with Somersault, DO NOT LET HIM DISTANCE HIMSELF FROM YOU otherwise Saville will bombard you with all the missiles that can stagger and do a LOT of damage. His melee combat is also lethal but pose little threat if you juggle him enough with somersault, couple it with a well placed emergency spin and you're set to go into the final battle.
- This is the true final battle, both you and Saville fighting in the air using Ref Boards installed in the LFOs. This is fairly simple compared to ground Saville since you can dodge his missiles by doing Lifting Tricks, the only thing that makes this fight difficult is the lack of experience fighting while lifting, the only advice I can give is to try to hit Saville by holding and aiming yourself in a straight line towards him then pressing CIRCLE to do Lift Attacks, please keep in mind that the NIRVASH has a different skillset compared to the 505.
- After you lay out Captain Saville and the cutscene begins, this is time and your timers should stop by then. Congratulations, you have speedrun Eureka Seven Vol.1 The New Wave Any%!
Apologies for splitting it up, this is because of speedrun.com's site changes that only allows 10k characters.
MISC
WIP

