This guide will be explaining your general goals and build choices in speedruns as Nona it wil work for all difficulties.
General Gameplan and Misc. Tips
- • Nona and Iron Wing are the two player "controlled-by-one" super combo. While Iron Wing shoots random targets at insane ranges, Nona can clear up the rest and deal a ton of DPS to bosses.
- • Nona's skillset is really diverse but in speedruns you want to narrow it down to the “Talent Craft” build. This means putting Iron Wing in Fire Mode, shooting rockets around with the Shoulder Cannon Upgrade. With this Ascend, Iron Wing will shoot random targets after being summoned, with a short cooldown.
- • Heavy Modification is used so that Nona can rapid fire her own rockets. Just run to where you have to be while pewpew’ing the enemies on your path.
- • For Bossing, just drop Iron Wing near aggro range so it can shoot Shoulder cannon. Meanwhile, just press and hold your secondary skill button to unleash your rockets.
- • Before Iron Wing gets his shoulder cannons its Nona doing all the work herself. So you have to clear the room with a combination of your own rockets and a good early game weapon like Star Ring or Rainbow.
The Build
The general idea of this build is upgrading Iron Wing into a super cannon. This means that Shoulder rocket cannon is essential to your build. After that its all upgrading the Super Robot Chicken.
The priority of the skills is something along these lines:

TLDR: in an ideal order, take Shoulder Cannon Upgrade followed up with Heatcore. After that you want Heavy Modification and from there you want to upgrade Heatcore and Shoulder cannon Upgrade. When you see a chance take Force recovery. To top off your build use Missile Storm and Energy overload. Make sure you have a pistol to use Battle Pace.
- Shoulder Cannon Upgrade (SCU): is your main priority. This ascension makes it so that Iron Wing can shoot rockets around the map so that Iron Wing clears the map while you run towards the gate. SCU is spread amongst the targets on the map. Every time you place Iron Wing the normal cooldown for SCU resets, Which means you can let him shoot his salvo of rockets and then drop it againto trigger another SCU. So the optimal way to utilize this is by dropping Iron Wing in front of you as soon as a map opens up and while running but prioritizing areas that are lined up with as many enemies as possible.
- Heavy modification: makes it so that Nona herself can shoot really fast. This way you can shoot at targets while running towards the end of the map. And when fighting a boss you can just simply hold your secondary skill button and the cannon will rapid fire.
- Heatcore: is just a straight damage upgrade on your rockets. But upgrading rocket damage doesn’t only upgrade the damage of Nona, it also ups the damage Iron Wing's rockets deal. When there is a choice you want at least one of these upgrades before the first boss to get a quick kill. But with the scaling there is no use in picking up all the upgrades at the start. With Heatcore level one you can basically make it out of the desert. Scrolls also help to up the damage. So balancing the damage is a bit up to feel. When you have sufficient damage, take more points in SCU. When you feel your not one shotting enough enemies, upgrade Heatcore. It’s a balance between the amount of rockets and the damage the deal.
- Force recovery: gives you back your rockets and ups the amount you can wield. So when you feel that you have a steady base damage take this. Also, any rockets Iron Wing shoots counts toward Force Recovery, so it comes down to the more pewpew Nona and Iron Wing do, the more pewpew Nona can do. Which results in being able to hold Heavy Modification up for a long time.
- Missile Storm: is the speed Iron Wing shoots at. So the rockets come out quicker and the time between the launches gets shorter. As a bonus it gives Nona a damage boost on her own rockets. This can add up pretty quick when fighting a boss.
- Battle Pace: is just a straight up speed upgrade when you hold a pistol. So be sure you pick up a pistol in the first few maps. You wont be shooting your own weapon since Rockets are going to be your best damage, so holding a pistol for the movement speed bonus is optimal.
- Energy Overload: this is a damage upgrade overall. Each time you drop Iron Wing both of you get a upgrade. And since your basically spamming Iron Wing the ascension has a high amount of uptime.
- NEVER take Suicide Device!: This might sound like a upgrade that does big damage, but it only slows down the spamming of Iron Wings and SCUs, which ends up a net negative in the long run.
- The rest of the ascensions are mostly worthless for our build. This is because Precision is all about shooting Which our build doesn’t do and Divine craft is about Iron Wing in battle mode, which he won't be utilizing.
The Weapons
The best overall weapon Nona has is by far the Star Ring. Combined with overconsumption it will one shot most of the early game enemies. This will keep you safe until Iron Wing is strong enough. Furthermore it procs with Battlepace to give you that slight movement speed boost. Other options are
- Rainbow: is a good pick as a starting weapon. It will hit trough walls and auto aims. This way you don’t have to be bothered with aiming, and just with moving.
- Concealed ammo: a starting weapon that helps you clear the bosses a bit quicker, and it will clear some nasty enemies when you throw it. The AOE on this weapon is pretty decent and is a good option when you’re out of rockets since it does good damage and replinishes secondaries through ammo consumption.
- Swords: When you don’t have Battlepace but you want that extra bit of movement, Swords are your friend.
The scrolls
A rundown for the scrolls to use for Nona in no particular order, sorted by type.
Damage
- Brutal gloves: 35% damage increase on your rockets.
- Bluff: 25% Damage increase on your rockets (with full HP).
- Double exhilaration: Double the amount of rockets you can carry.
- Evil-Devouring sword: 20% Damage up for every cure scroll. Most curses are manageable since there's few that affect movement or skills. Especially if you also find Evil-Banishing talisman.
- Enduring caster: 1% rocket damage for every 5 hp.
- Vindictive nature: 40% rocket damage for 10 seconds when hit.
- Final judgement: Kills the bosses quicker.
- Elite assassin: Especially in Reincarnation runs, there are a lot of bosses overall. So that’s flat 10% damage per boss.
- Rational overconsumption: 80% Rocket damage. in drops when you shop, but since you don’t have time to shop a lot, it wont drop a lot.
- Dual edge: 1% Damage for every enemy you kill.
- Deadly curse: 75% Rocket damage for 75% HP.
Movement
- Snow boots: Immunity to slows.
- Abnormal speed: 3% Movement speed for ever 10% Shield.
- Advanced joggers: 50% Dash cooldown (so bash that shift button).
- Decay driver: Doesn’t add a lot overall. But it is part of the Speed-Runner collection.
- Tactical reload: Same as Decay driver.
- Propulsion device: More dashes = more speed.
- Strategic advantage: 40% Speed after a dash. So keep on dashing.
- Ostrage rider: 50% Movement speed. Only 300% extra CD on dash.
Other
- Extra Surprise: Better chance for enemies to drop secondary charges.
- Curiosity box: Free scrolls. And if they suck, just drop them.
Spiritual blessing
(Reincarnation only)
Before you start you can pick overconsumption as your Lone wolf bonus. This blessing is by far the best starting pick. From the vendor you want to get Fire Coverage. The rest will be according to what you can get during the run.

Skill freak: This is just a flat damage up 75% to deal 200% damage and 25% to deal 300% damage. This while Iron Wing shoots 10 Rockets. Huge damage increase.
- Copycat: in a speedrun you kill a lot of enemies fast, so you will basically stack all the buffs quickly. This means a LOT of speed, cooldown reduction, HP and so much more.
- Endless assault: this doubles the amount of rockets Nona carries. And on top of that 1 rocket ammo every 3 seconds.
- Armed caster: 50% damage up for every crit your weapon has. You will mostly be running starring. So that’s about 3.5 x 50% so a 175% damage increase.
- Field Proficiency: Cooldown on the dash and the primary skill for every elite kill. So at least 4x -6% per floor. So that is 24% cooldown reduction per floor (except first one)
- Scroll master: when there is nothing better to take. This is a good gamble to get Speedrunner or any damage up
- Ultimate gambler: When there is nothing better to take. This is a good one to have a bit more chance to get the ascensions to want to get.
The Mechanics
Overal mechanics
Nona has some unique gameplay, this is because you basically have to play 2 characters at the same time which sounds way more difficult than it really is. Just remember the basics and the rest is just about playing Nona and practice.
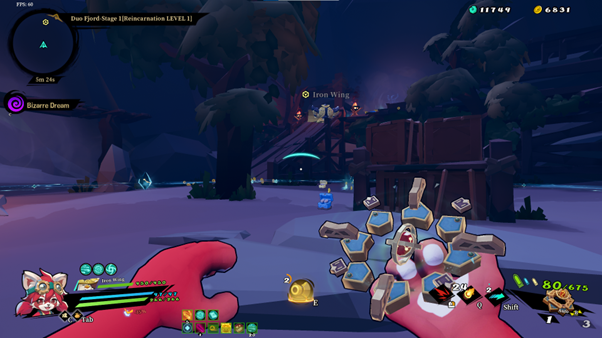
At the start of the run you put Iron Wing into Fire mode, this can be achieved by pressing your middle mouse button (scroll wheel). By doing this Iron Wing can be dropped down and he will start shooting 1 rocket at the time as a rocket launcher. The goal is to get the Shoulder Cannon Upgrade as soon as possible. With this skill Iron Wing will shoot 10 rockets hitting 10 targets on the map (this can be 10 different ones or 10 times the same like a boss). This cooldown resets on a timer or every time Iron Wing is summoned.
On the other hand you want Nona to help deal damage with her secondary skill too. With Heavy modification, Nona can rapid fire and since the rocket is an explosion with scaling AoE, you don’t even have to aim so well 😉.
So for clearing the rooms its all about placing Iron Wing in a way so he has the best line of sight with most of the enemies. He does ignore some of the collision, but not all of it like hard walls. You should just try this a bit, and practice the placement. Meanwhile Nona can run towards the end of the floor while clearing the leftovers.
Bosses are even easier. This just means throwing down Iron Wing on cooldown while Nona just spams her own rockets.
(reincarnation only)
Star Ring + Overconsumption kills almost everything in one shot in the first stage. The extra benefit is that Star Ring also hit through walls
Example placements for Iron Wing
There are several ways you can make Iron Wing kill stuff before you are able to. The most common one is cutting corners. A couple of examples are:

Hopping in a room. Dropping Iron Wing at the end so it starts killing enemies while the spawn in the roof and walls that would require you to aim really good. Instead, Iron Wing justs has auto aim.
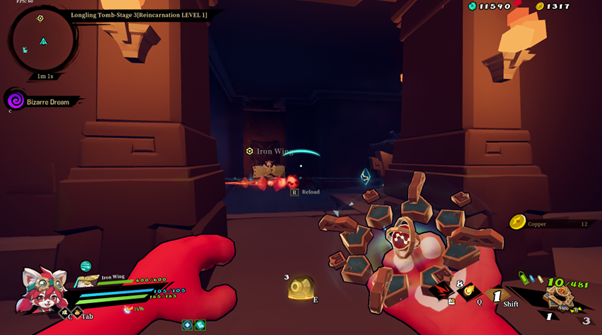
This room consist out of 2 “rooms”. Dropping Iron Wing in the second one lets him start clearing, but since he has a line of sight of the first one, he's able to clear both.

By dropping Iron Wing on top of the ramp he will start clearing the top floor. Since you don’t even have line of sight of it yet, he will be nearly done once you’re up there.

In world 4 there are a lot of long roads with corridors. Always be sure to drop Iron Wing ahead of the corner. So you can have a safe peek around when you arrive.

Same goes for the late levels with the hills and obstacles. Just pop him on top while your running.
An other way to utilize Iron Wing is to make sure he is in lie of sight with as many enemies as possible. Some rooms are designed to run circles. So make sure Iron Wing does most of the work so you don’t have to keep running.

By dropping Iron Wing in the middle here, he can kill enemies that spawn upstairs,
but also the ones behind the fence of the path on the right.
By dropping Iron Wing on top of the ramp, he will have line of sight with the enemies on top and at the bottom.

Here enemies spawn on both sides of the rock. Just make sure Iron Wing is on top so the spawn location doesn’t matter.

This is a location to show how tanky Iron Wing is. Just drop him in the middle of the fight. He will clear everything also the flying saucers.
Extra Notes
Anything written here is subject to change as we learn and discover more about the game over time. If you have questions that aren't answered in this guide you can find a lot of runners in the Speedrun-Disucssion channel of the official Gunfire discord. The discord is linked at the very top of the leaderboards or at https://discord.com/invite/gunfire-reborn
Please check out the category and game rules before doing any runs!
Good luck!
Lone Wolf Multiplayer Bypass
By complete accident, jonwillbert & i have discovered a way to enable the Lone Wolf bizarre dream in co-op when it's meant to be singleplayer only, after some testing we discovered it's about 90% consistent to enable Instructions:
- Whoever is hosting the game sh